User’s Manual
Contents
Project Explorer Window
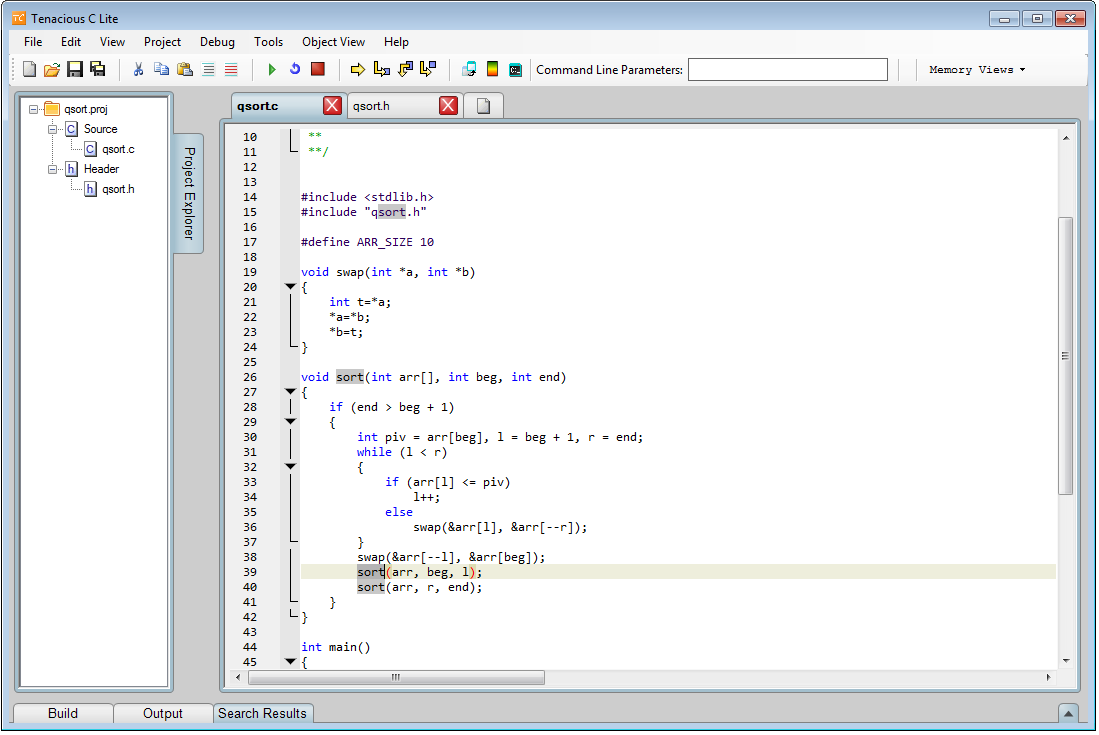
The Project Window is the location where project files are managed. The project explorer tab is located on the left side of the Tenacious C IDE. Tenacious C uses a main project file (.proj) to maintain C files specific to the project. These files, both C source files (.c extension) and C header files (.h extension) are separated and presented in a hierarchical manner.
Tenacious C will not compile and build unless there is an open project. Therefore, there are two ways to bring a project into the Project Explorer: create a new project or open an existing project.
Creating a New Project
To create a new project, access the menu strip by clicking on File->New Project. Next, the Project Wizard pops up providing a guide for the user through new project creation.
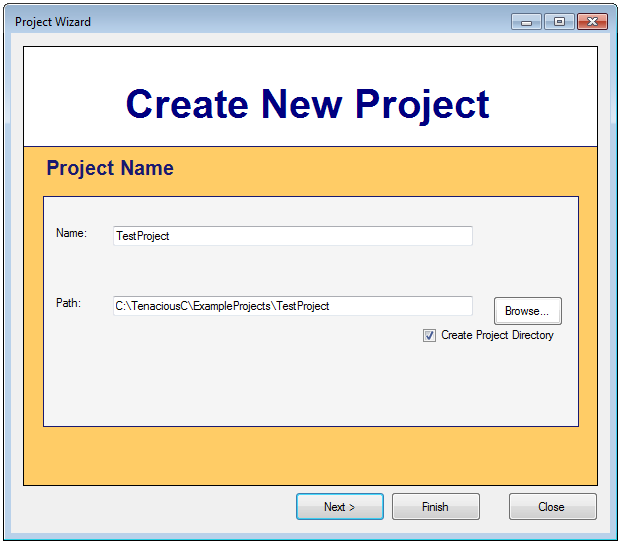
Enter the project name and location the new project will be stored. The wizard gives the user the option to create a new directory for this project which separates the project from other files in the selected location. The user can opt to finish at this point or continue to customize the current project being created. If the user clicks ‘Next’, the second screen allows project customization.
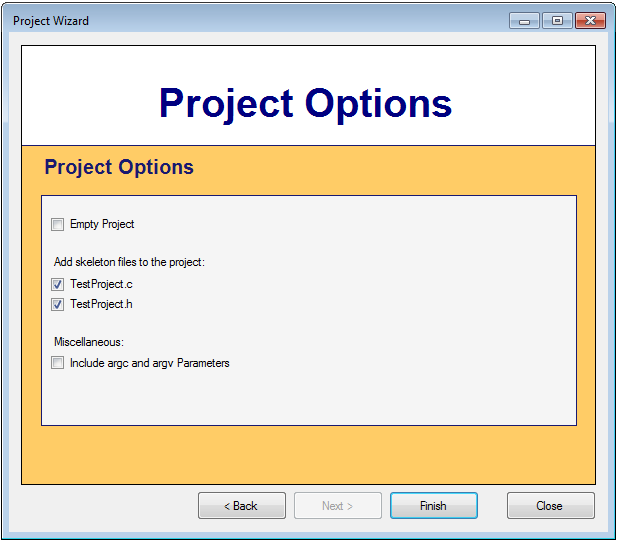
The Project Options screen allows the user to automatically add an empty source or header file, along with including command line arguments. By selecting ‘Finish’ this will put the new project into Tenacious C.
Open an Existing Project
To add an existing project into Tenacious C, access the menu strip by clicking on File->Open Project. Next, a Windows file browser pops up and allows the user to search for a project that Tenacious C can read, specifically .proj extensions.
Operating the Project Window
The Project Window maintains the project files in the currently opened project. If no project is opened, there will not be any source or header files visible, and the Project name will simply be Project. However, as you build your program, you need to add and remove files to the project. When a project is opened, the user can remove or add files to the current project by right-clicking and selecting the desired option. First, let address adding files. The user has two types of files to add: C source and C header files. Furthermore, the user has the option to add/create a new source file or add an existing source file.
Currently, Tenacious C provides three methods to add new source files to a project file.
- 1) Right click in the project explorer area and select ‘Add New Source’
- 2) Click the New File icon on the tool strip
- 3) On the menu strip, go to Project->Add New Source
Additionally, there are two ways to add existing files:
- 1) Right-click in the project explorer area and select ‘Add Existing Source’
- 2) On the menu strip, go to Project->Add Existing Source
Note: The area in the project explorer in which the right-click occurs will determine what file type to filter (.c or .h). For example, if the right-click occurs in or below the ‘Header’ sections of the explorer, the file explorer that opens will default to header file creation or importing.
Removing Project Source Files
Not only can source files be added to the current project, but they can also be removed. This is useful when source files contain useless or deprecated functionality.
There are two ways to remove source files. First, highlight or select the source files that are targeted to be removed.
- 1) Right-click in the project explorer area and select ‘Remove Source’
- 2) On the menu strip, go to Project->Remove Source
Miscellaneous Features
Because the project explorer window does utilize quite a bit of visual real estate, it is possible to collapse the project explorer by simply clicking on the tab denoted ‘Project Explorer’. Conversely, it will also expand from its collapsed state by again clicking on the Project Explorer tab.
Lastly, it is possible to expand and collapse the project hierarchy by right-clicking in the project explorer and selecting the ‘Collapse All’ or ‘Expand All’ options.
Editor
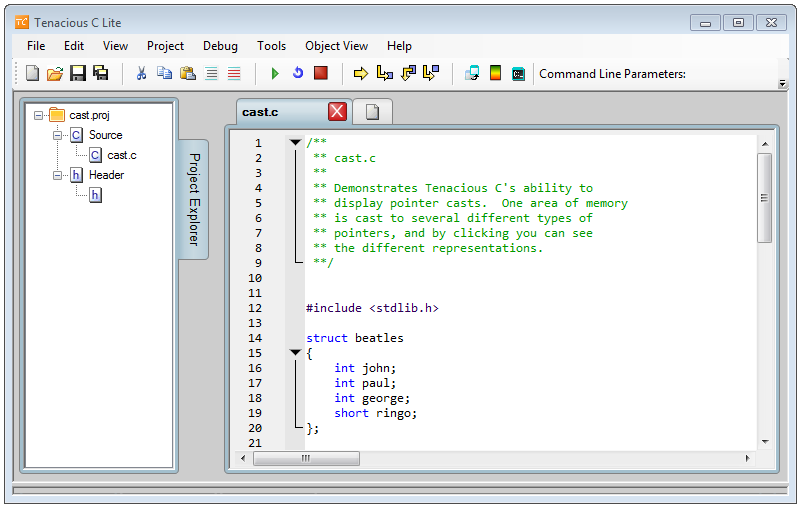
The editor provides the interface to write C code, but it also has some advanced features that makes C programming easier with Tenacious C. Also, Tenacious C provides a tab control around the editing windows to give the user the ability to edit multiple files. The tab control can handle numerous files and provides certain trivial functions such as creating new files and closing files.
Editing With Tenacious C
Besides the visual aspect of program internals, Tenacious C provides some helpful editing features that make C coding easier and less time-consuming.
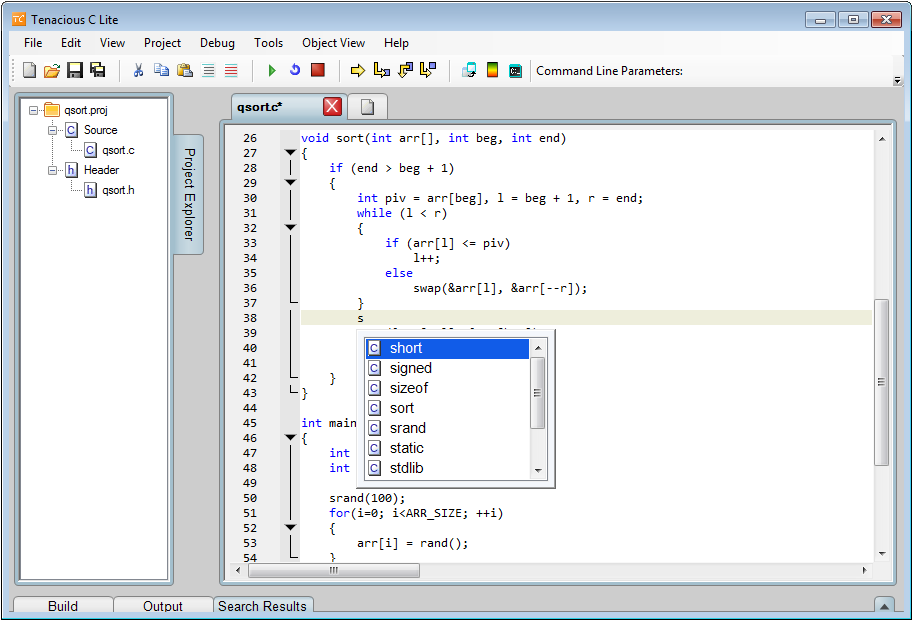
Auto-complete and Intellisense
One of the more useful editing features in Tenacious C is the auto-complete functionality. Auto-complete senses words currently used in the text file and presents them in a list form to the user for quicker word insertion. To insert the word that is highlighted in the list, one can either press the ‘Tab’ key or double-click on the selection. Additionally, Tenacious C also inserts all C keywords into the auto-complete list even if they are not present in the current file.
Tenacious C also implements intellisense. Intellisense allows the user to get access to defined structure parameters and members along with functions and their arguments. This makes coding easier and efficient while reducing the possibility of coding errors.
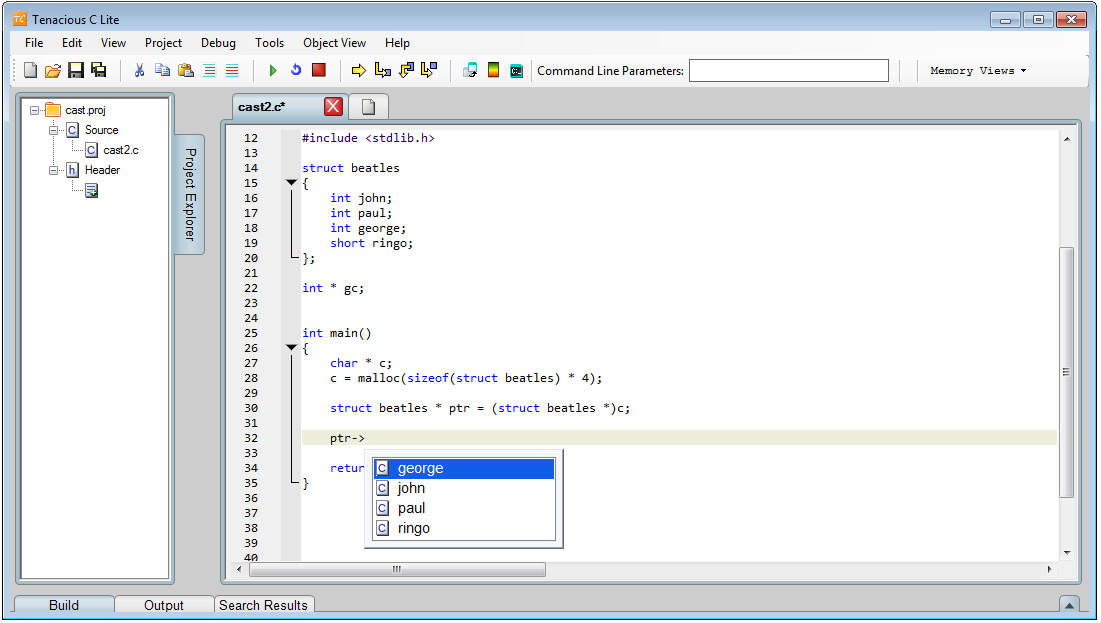
Notice that the structure has four defined members and the Tenacious C intellisense exposes all of the members in the list. Similar to the auto-complete functionality, simply ‘Tab’ or double-click the correct selection in the list to insert it into the code.
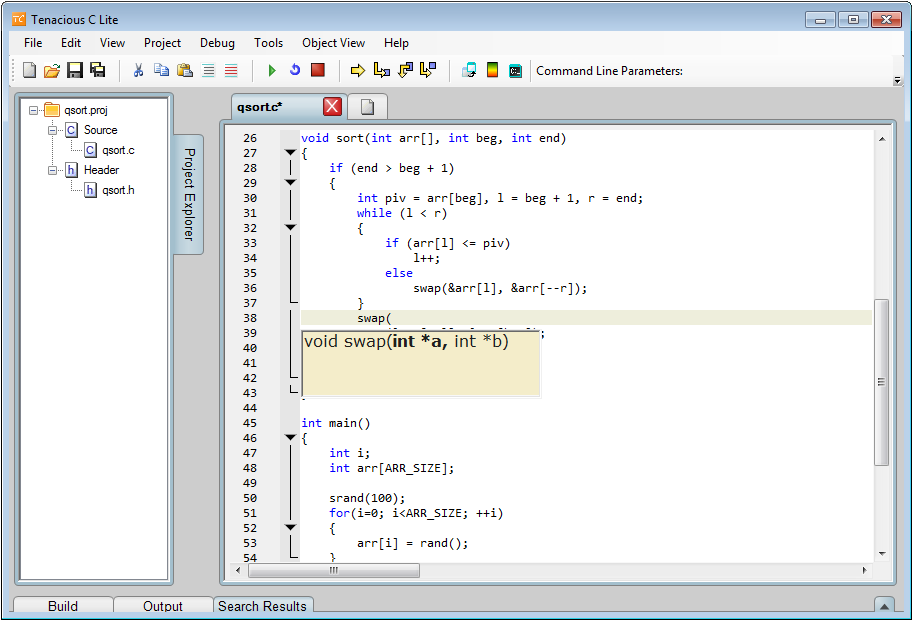
When filling out instanced function arguments, the function intellisense windows pops up and guides the code. The current argument will be highlighted in bold.
Find All References and Go To Definition
Tenacious C provides a few other text-navigating features to help reduce code time and enhance debugging capabilities. First, the ‘Find all References’ feature allows the user to find all references of a certain member or function used in the project. This includes any source or header file that comprises the current project.
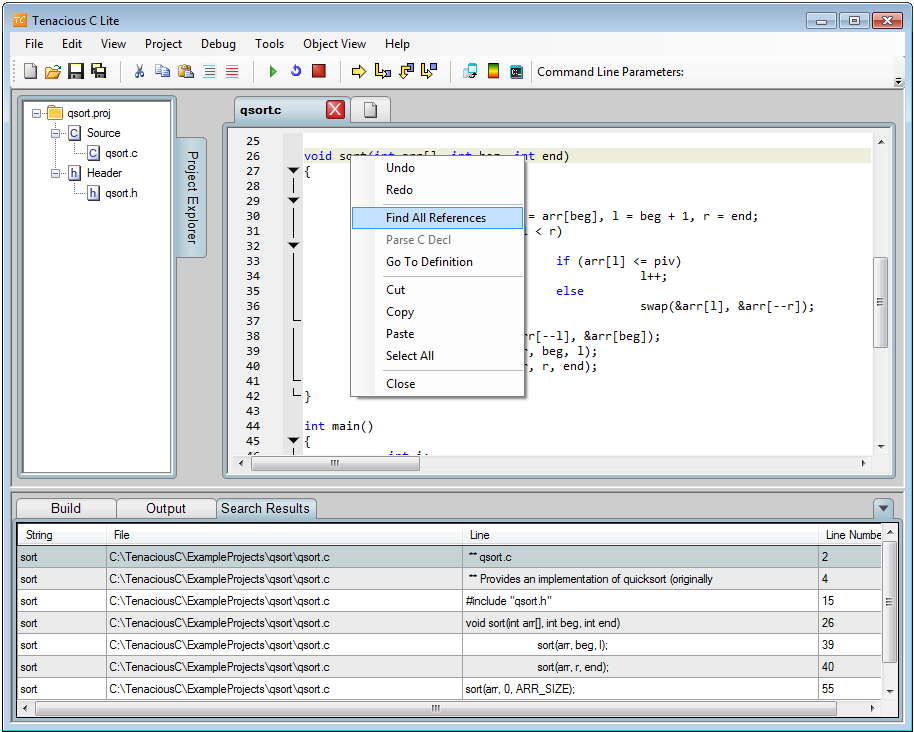
Double-clicking on any of the valid search results will take you to the location of the selected result.
Another feature similar to Find All References is the use of multiple selection capabilities. For example, in Tenacious C, when you double-click on any word in a source file, all instances of that word will become highlighted. This is useful for a quick visual reference of the targeted word.
Finally, ‘Go To Definition’ is a feature that allows the user to right-click on any member or function in the current project and find its definition or declaration. In fact, it will bring the cursor to the definition, and it will open any closed files where the definition may be declared.
Advanced Features
Tenacious C provides a very useful feature called ‘Parse C Declarations’. This feature allows the user to select a declaration anywhere in the source code and receive a print-out of the declaration in human-readable format. A declaration is the definition of any variable, function, or structure in the source code.

Parse C Declarations is accessed by right-clicking on a declaration in the source code and selecting ‘Parse C Declarations’. Additionally, you can clear the CDecl display by right-clicking on the printed results of the CDecl call and selecting ‘Clear Results’. To use this feature, you must have the Full Version installed.
Compiling a Project and The User Messages Tab
The primary benefit of using Tenacious C is the visual representation of the C programs that the user creates. However, to evoke the display, Tenacious C must have a project opened and the program must compile. If there is a valid program open, and it is ready to compile, there are three ways to compile the design.
- 1) Press the green Play button in the tool strip at the top.
- 2) Press the F5 key on the keyboard.
- 3) Access the menu strip and select Project->Run.
After attempting to compile the program, Tenacious C will either successfully build or it will fail. If the project does build, there are some minor aspects to be aware of with respect to viewing program results.
Build Success
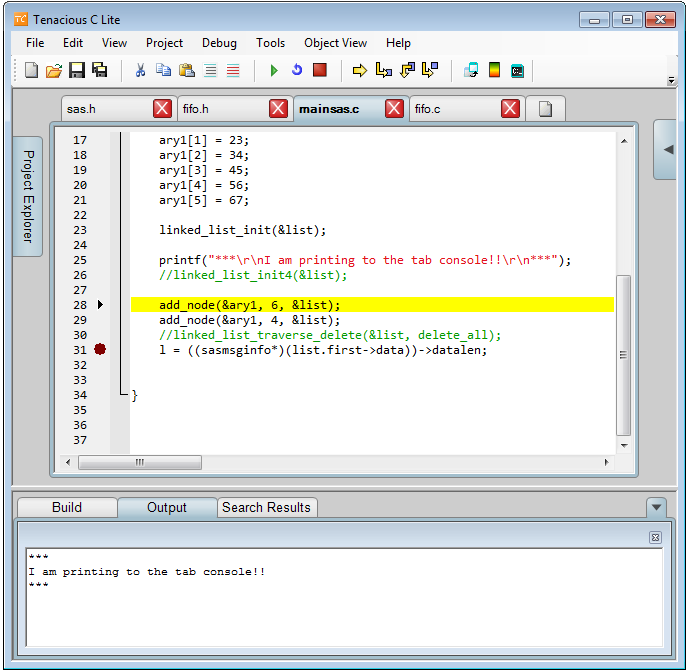
First, Tenacious C comes installed with the option to stop execution on the first line. This option can be located in the menu strip under Tools->Global Settings->Execution Settings. This forces the program to stop on the first line and it will be up to the user to either step through or continue running the program until completion. Tenacious C is set up this way so the user can see the visual output in the Object View to the right of the editor.
Second, if the ‘Stop Execution on 1st Line’ option is not selected, and there are no breakpoints or blocking function calls like scanf that require user input, the program will most likely flow automatically to completion and the user will not be aware of any console output or visual display. This may be perfectly fine if the user simply desires to use the program to crunch numbers and create an output to a file or communicate to a server and send data packets without having the main Tenacious C window in view.
Lastly, if the ‘Stop Execution on 1st Line’ option is not selected, and there are breakpoints or blocking function calls like scanf the program will stop at either the first breakpoint or the first blocking function call.
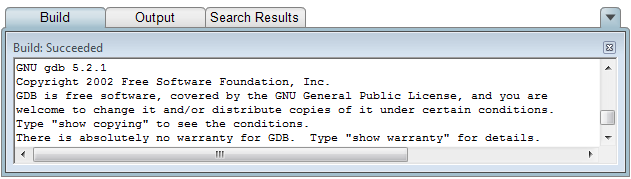
If Tenacious C is halted on a successful build, the user can view the results of the build by expanding the User Messages Tab located at the bottom of the environment. To expand or collapse the tab display, locate the arrow button on the far bottom right of Tenacious C. Also, the Object View will become available on the right side of Tenacious C. This is a very interactive display that helps illustrate the current state of the program. Click here to view the Object View.
Build Fail
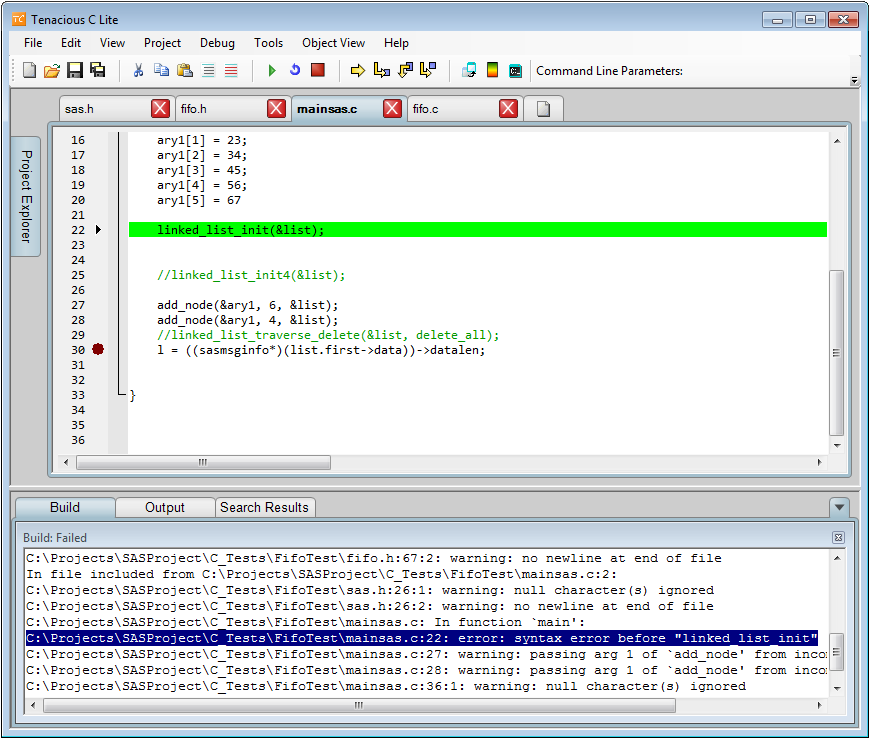
When Tenacious C fails to build properly, the program will not run, and the User Messages Tab will come into focus. The Build Tab will display the error(s) in the code that are preventing the program from compiling.
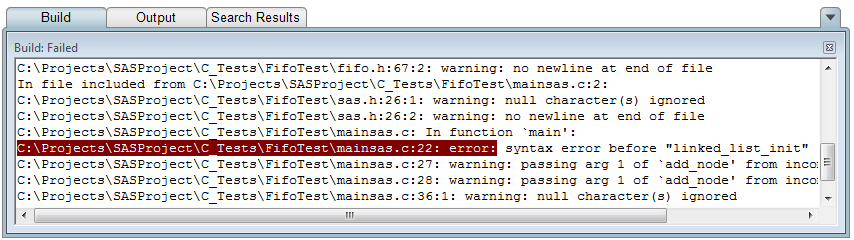
The Build Tab allows the user to double-click on the statement that displays the error, and it will take the user to that line in the code that is creating the error in the code. Furthermore, when the program fails to build, and the error is not trivial, the user is presented with an option to go to the support forums on tenaciousc.com to post a question.
Console Output
Tenacious C also pipes console output, such as printf(), to the Output Tab. However, it currently does not support user input.
Search Results
Finally, The User Messages Tab has the Search Results tab. This tab displays the results of the user’s request to either Find All References or the Find in All Files/Document functionality from the Search menu. For further documentation see …but as previously stated, double-clicking on any of the valid search results will take you to the location of the selected result.
Program Execution Using the Tool Strip, Menu Strip, and Shortcut Keys
Once the program has successfully compiled, the user can run through the program in several manners using the tool strip, menu strip, and shortcut keys.
Execution Actions and Associated Controls:
- Running the program until completion, error, or user-required input. Press the Play button or F5.
- Stepping through code.
- Step: Steps through each instruction. Press the Step Button or F10.
- Step Into: Steps into functions if applicable, otherwise performs normal stepping operation. Press the Step Into button or F11.
- Step Over: Steps over functions and executes the code within that function. Press the Step Over button or F10.
- Stopping execution. Press the Stop button or Shift+F5.
- Re-compiling/Restarting program execution. This recompiles the code and includes any changes you may have made to the source files. Press the Restart button or F6.


The Object View
The Object View is the control that provides the visual representation of compiled C programs. The object view displays all memory information from the compiled program including stack, dynamic, and global memory in a visually intuitive manner. All memory arrangements such as structures or arrays are depicted in the object view. The user can choose to interact with the object view by using the mouse to manipulate the position of certain parts of memory, click on pointers for source and target information, show specific regions of arrays, and many other functions.
The Object View is located on the right side of the screen, but it does not appear until successful compilation of a project. We will assume for this section that the build is successful. To find help on failing builds, go to BUILD FAIL.
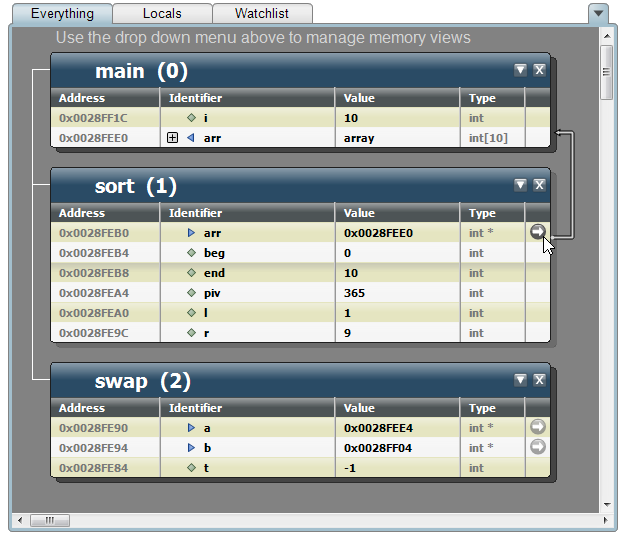
The stack memory views that inhabit the left side of the Object View are not movable like we will encounter with the dynamically allocated memory, but they have the ability to be collapsed or hidden. The collapse/hide feature is implemented because the Object View can become pretty large depending on the size of the program, number of function calls (especially with recursion), and the number of dynamically allocated memory calls. The user can choose to hide or collapse exposed memory views as shown in the figures below. Additionally, the user can also zoom in and out by using shortcut keys F3 and F4 respectively, or there is also the option to hold down the control key and use the mouse wheel.
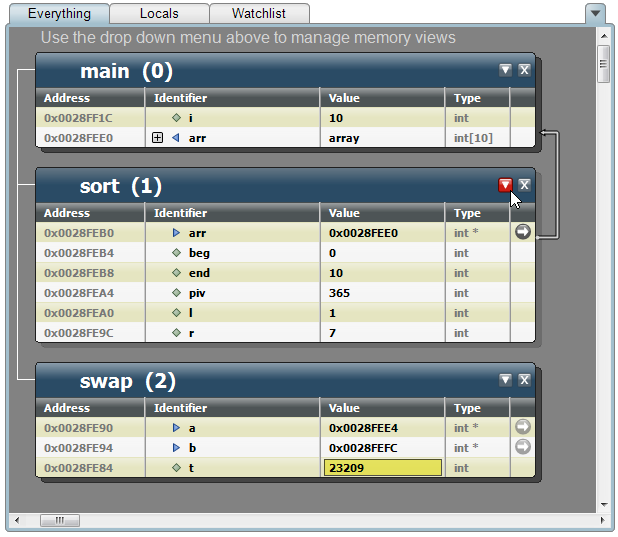
Click on directional arrow to collapse memory views.
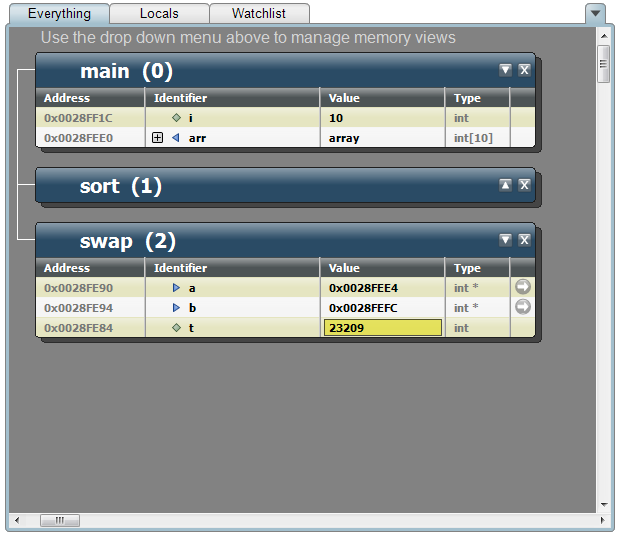
Click on directional arrow to expand memory views.
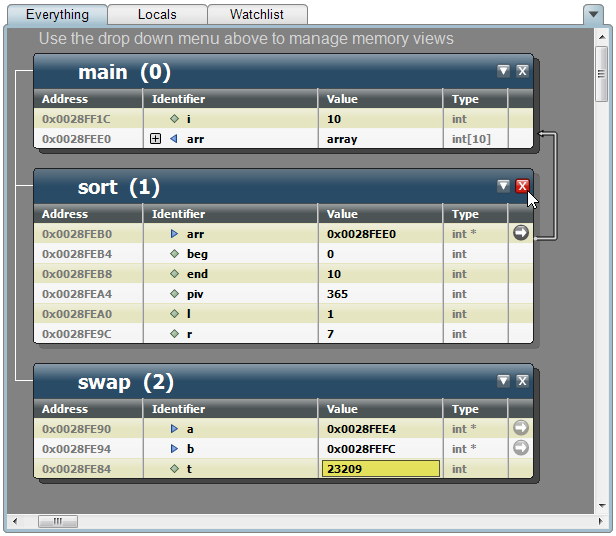
Click on ‘X’ button in memory view to hide it from view.
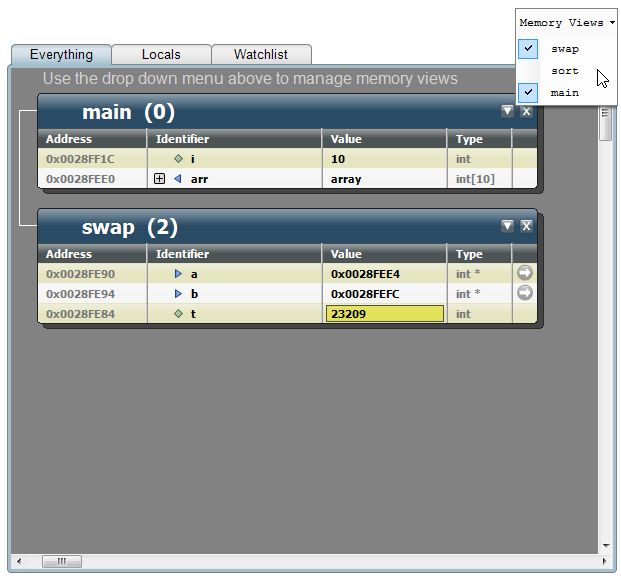
Locate the hidden memory views in the Memory View menustrip and select them to display them in the Object View.
Object View Options
By right-clicking on the Object View at certain points, the user can access several options that pertain to its display and behavior. For example, right-clicking on the Object View background where no memory views are being draw will give access to some important options such as:
Auto-arrange – Will reorganize all currently draw memory views into their dedicated regions (stack, heap, etc.) and in calling order.
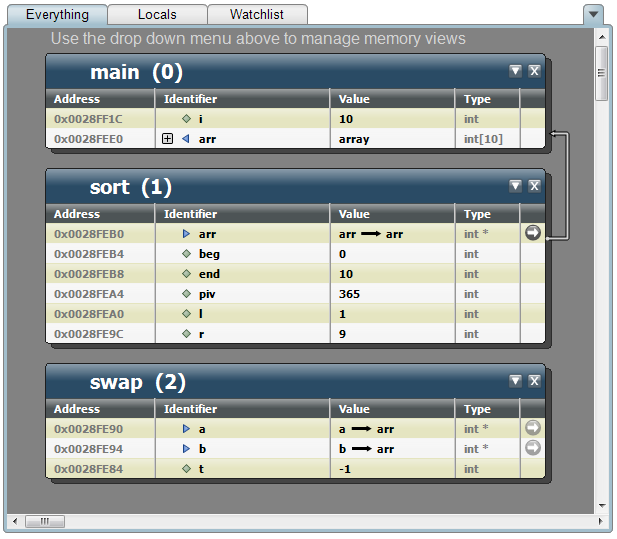
Pointers – Allows the users to change the value of the pointer to either represent the address in which it is pointing to, or it can be drawn as an arrow pointing to the name of the location in memory.
Data Radix – Change the radix of the data display to binary, octal, hexidecimal, or decimal.
Push In – If the Object View is popped out of the Tenacious C environment, this will push it back into its tab control.
Pop Out – Allows the Object View to be separated from the Tenacious C environment and become its own separate form to control.
Changing Data Radix

View Pointer Values as Arrows
Enhanced Debugging Indicators
The Object View has certain built-in features that make debugging easier for the programmer. The indicators include pointer tracking and display, changed-value highlighting, symbolic identifier buttons, an array form viewer, and linked list identifier.
Easier understanding and tracking of pointers
Pointers are sometimes difficult to conceptualize for programmers both new and old. The Object View simplifies pointer usage by using arrows to make the logical connections of what said pointers are actually pointing to in memory. Furthermore, the Object View will also show uninitialized pointers denoted by red exclamation points next to the pointer variable names. This alerts the user right away that the uninitialized will most likely fail to work properly and can give very unpredictable results. These indicators are part of the symbolic identifier buttons.
Change-value Highlighting
As the user steps through the code, the Object View updates the necessary variable and memory changes. The most recent changes will always be highlighted.
Symbolic Identifier Buttons
The Symbolic Identifier Buttons are embedded in the Identifier field of the memory views. They provide warnings and information along with performing a few actions. The currently supported symbols are as follows:
Warning: shows uninitialized pointers.

Arrow Left: indicates this symbol (variable, pointer, function) is being pointed to and is valid.

Arrow Right: indicates this pointer points to a valid symbol (variable, pointer, function) and is valid.

Diamond: this is a normal variable that is pointing to nothing and has no pointers pointing to it.

Array Form Viewer
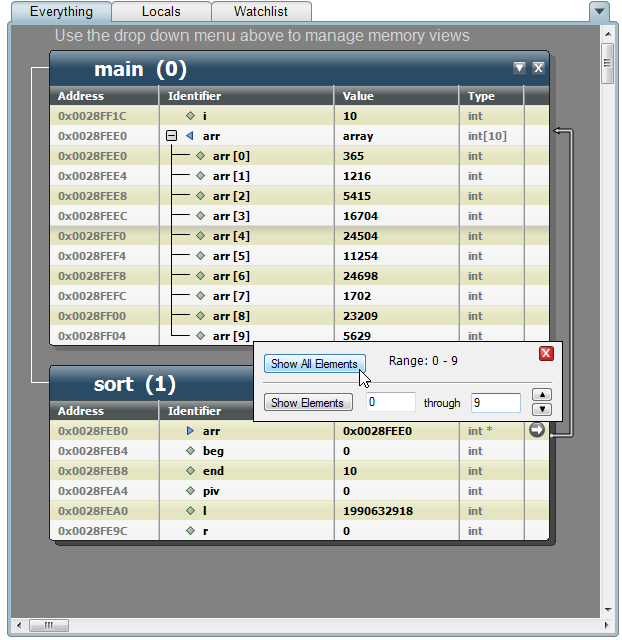
Another feature embedded in the Object View is the Array Form Viewer. This form pops up when the user right clicks on the head of an array. Arrays are designated with a head node that shows the name of the array and its total number of elements. Arrays default to showing only 5 elements. If there are more than 5 elements in any array you must use the Array Form Viewer to see more, or you can mouse wheel over arrays to scroll through the elements.
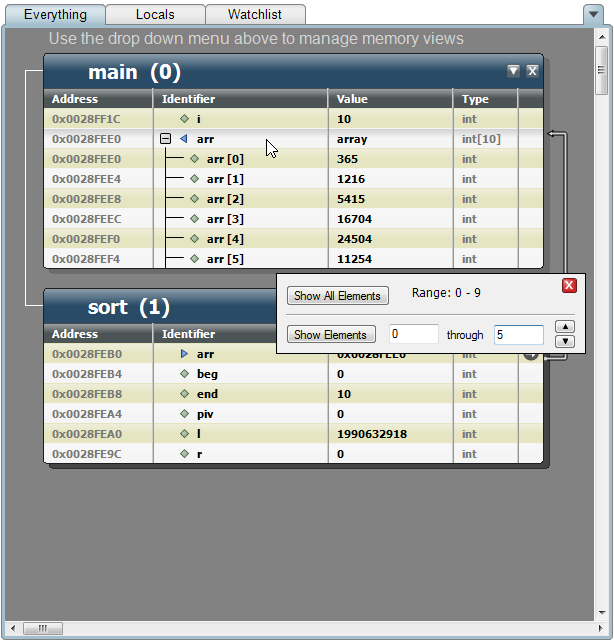
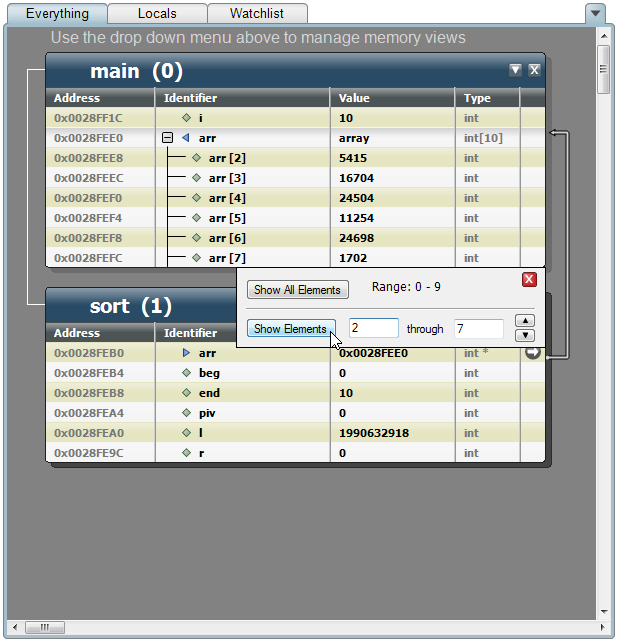
The Array Form gives the user the option to display the full array, a section of the array, or none of the array.
Full Array
Array Section
Object View Features
- shows most recent value change
- shows uninitialized pointers
- allows the user to expand/collapse arrays and structures
- shows the global, stack, and dynamic memory separately
- shows individual functions on the call stack separately
- illustrates the results of casting to any data type
- intuitive depiction of pointer operation, shows the pointer as a source and what it’s pointing to as the target
- ghost pointers alert the user that a pointer is pointing to data that is current not visible
Object View Functions
- Expand/collapse arrays and structures. Click on the +/- field when displayed in the Object View
- Click on an initialized pointer to see its target.
- Grab the title bar of any dynamic memory to move it around the Object View. Any pointer source or target will follow the new dynamic memory location.
- Zoom in and Zoom Out features. Press Control+Scroll Mouse Wheel or Press F3 for zoom in and F4 for zoom out.
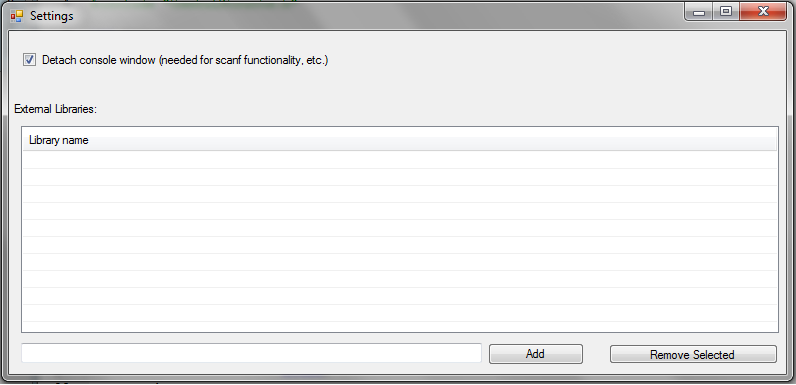
Input and Output
Currently, input and output functionality with features such as printf and scanf is accomplished using the Tenacious C command line. Users must compile the program with the console window detached. To detach the console window, go to Project-> Settings and check the ‘Detach Console Window’ feature. If your project is already running, you must recompile using Run or Restart.